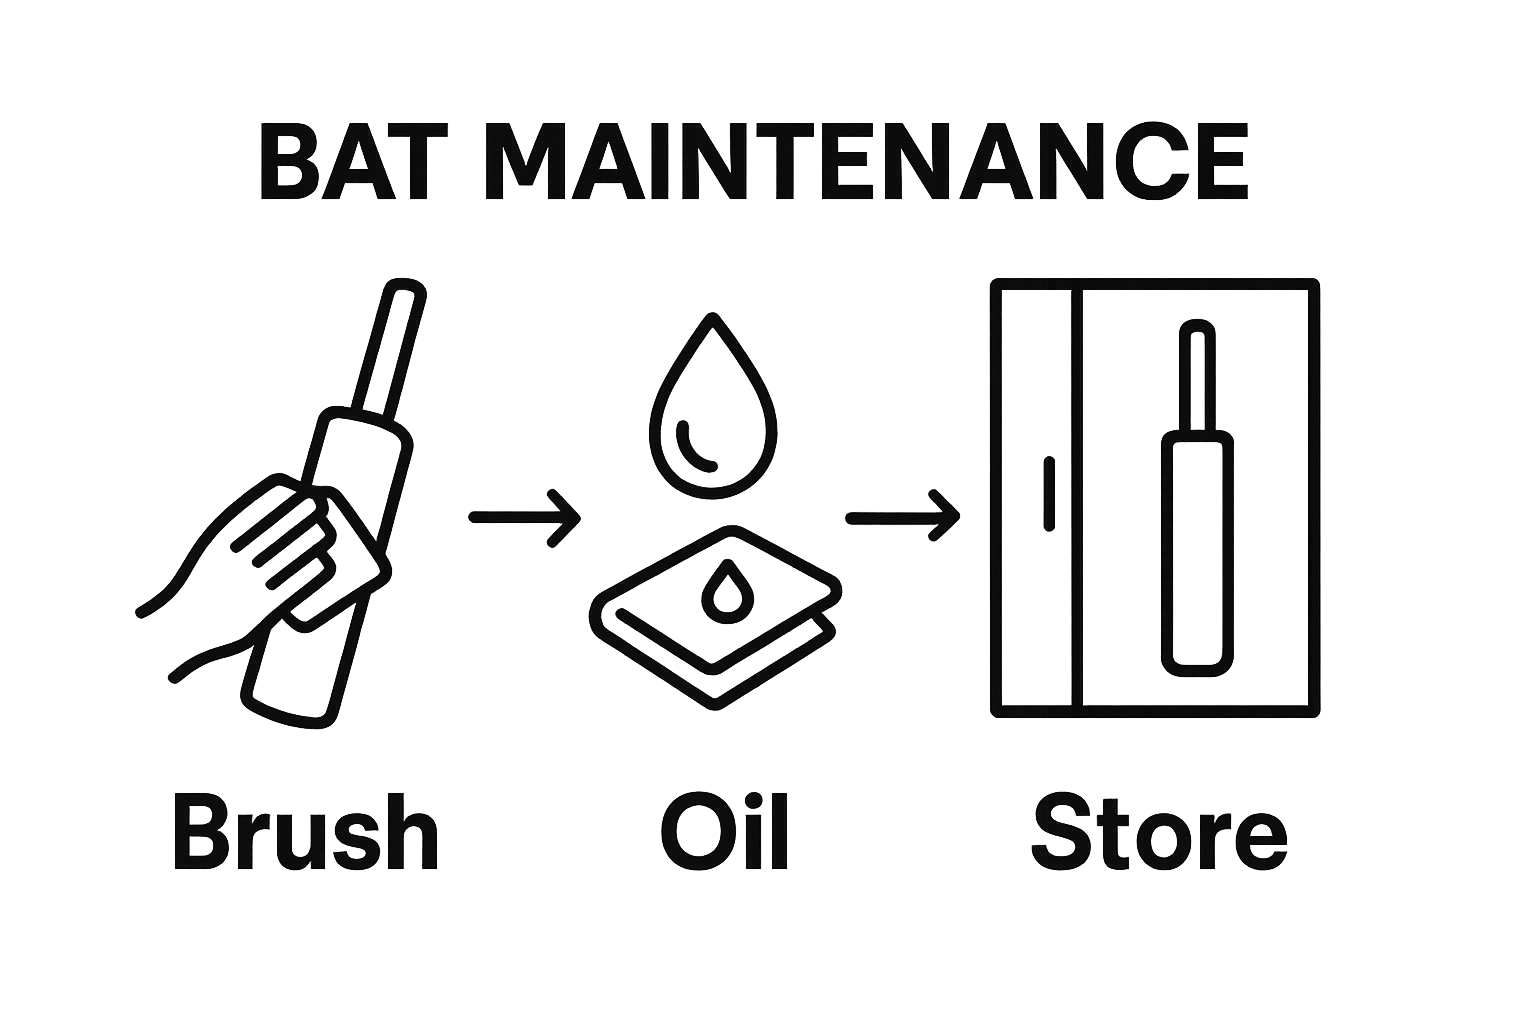
Essential Cricket Bat Care Tips for Peak Performance
Cricket bats are more than just sporting equipment, they hold the power to make or break a game. Did you know that storing your bat in an environment with humidity higher than 55 percent can lead to cracks and warping almost overnight? Most players fuss over which bat to buy, focusing on weight and balance, but hardly anyone talks about the simple habits that keep a bat lasting for years. That quiet routine is what separates a bat that falls apart in a season from one that stays match-ready year after year.
Table of Contents
- Step 1: Clean Your Cricket Bat Thoroughly
- Step 2: Apply Protective Oil To The Blade
- Step 3: Use Protective Face Tape On The Bat
- Step 4: Store Your Bat In A Safe Environment
- Step 5: Inspect Your Bat Regularly For Damage
Quick Summary
| Key Point | Explanation |
|---|---|
| 1. Clean your bat regularly | Thorough cleaning prevents build-up of dirt and moisture, protecting the bat’s performance and lifespan. |
| 2. Apply linseed oil to the blade | Oiling nourishes the wood, preventing cracking and maintaining quality. Apply 2-3 times a year. |
| 3. Use protective face tape | Taping protects the bat’s surface from impacts, extending its functional life. Replace periodically to ensure effectiveness. |
| 4. Store in a consistent environment | Proper storage away from extreme temperatures and humidity prevents damage and warping. |
| 5. Inspect for damage frequently | Regular inspections help discover small issues before they worsen, preserving the bat’s integrity and performance. |
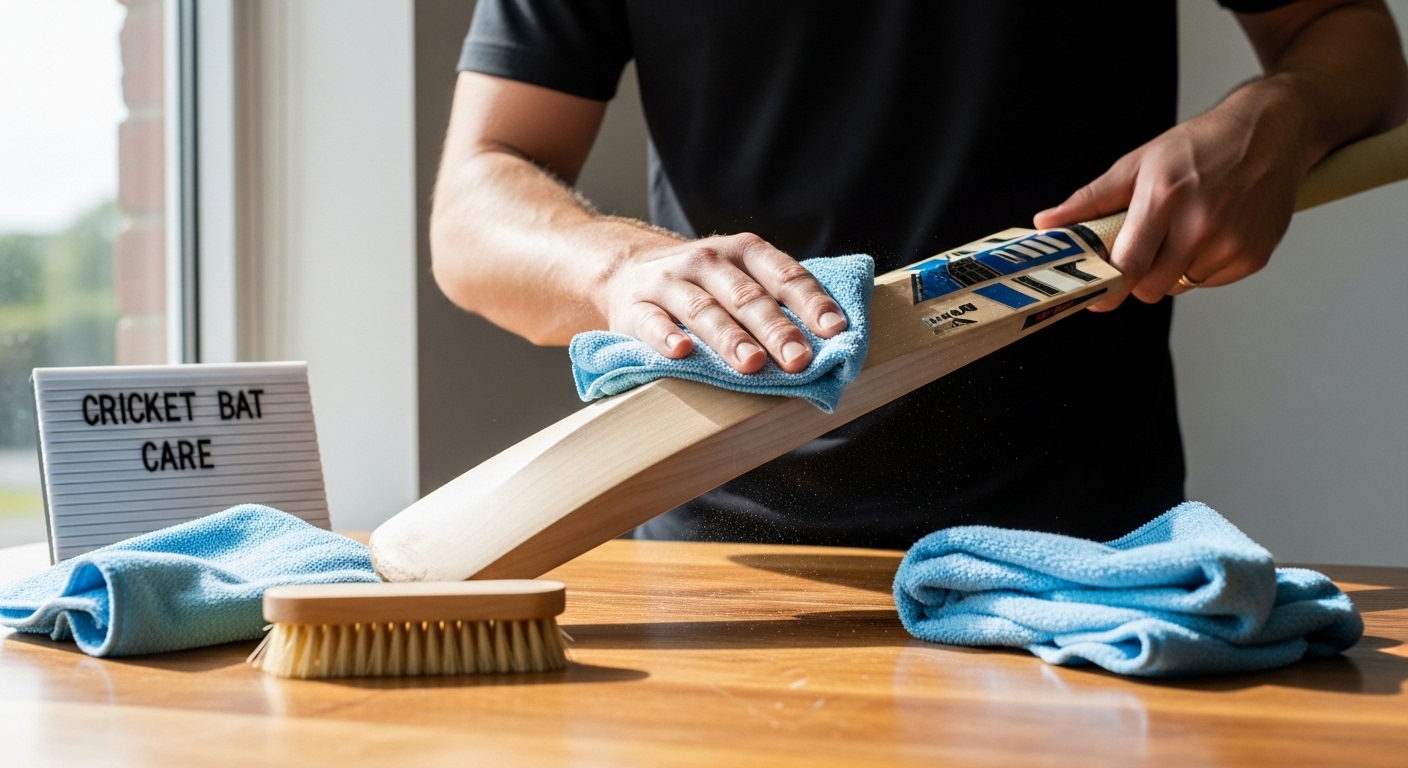
Step 1: Clean your cricket bat thoroughly
Cleaning your cricket bat thoroughly is the foundational step in maintaining its performance and extending its lifespan. Before you begin any maintenance routine, understanding the delicate nature of your bat is crucial. Different types of cricket bats require specific cleaning approaches, with wooden bats particularly needing gentle handling to preserve their structural integrity.
Start by gathering the right cleaning tools. You will need a soft, dry cloth or microfiber towel, a slightly damp cloth with minimal moisture, and a soft-bristled brush. Avoid using water excessively or harsh cleaning chemicals that could damage the bat’s surface. Wooden cricket bats are sensitive to moisture and can warp or deteriorate if improperly cleaned.
Begin the cleaning process by removing loose dirt and debris. Use the soft-bristled brush to gently sweep away dust and particles from the bat’s surface, paying special attention to the edges and handle. Move in gentle, consistent strokes to prevent scratching the wood. For stubborn dirt patches, use the slightly damp cloth, ensuring you wring out excess water so the cloth is merely damp, not wet. Gently dab or wipe the surface, being careful not to saturate the wood.
Focus on the bat’s critical areas. The blade and handle require meticulous cleaning, as these zones accumulate the most grime during play. Wipe down these areas carefully, removing any accumulated sweat, grass stains, or mud. If you’re dealing with more persistent marks, use a specialized cricket bat cleaner recommended by professionals. Our guide on choosing the right cricket bat provides additional insights into bat maintenance.
After cleaning, allow your bat to air dry completely in a cool, dry environment. Avoid direct sunlight or heat sources, which can cause the wood to crack or warp. Once dry, you might want to apply a light coat of linseed oil to protect the wood and maintain its condition. Remember, proper cleaning is not just about appearance but about preserving your bat’s performance and structural integrity.
Verify your cleaning process by checking that the bat looks clean, feels smooth, and shows no signs of moisture retention.
 A well-cleaned bat will have a uniform appearance and feel dry to the touch.
Step 2: Apply protective oil to the blade
Applying protective oil to your cricket bat blade is a critical maintenance step that preserves wood quality and prevents premature cracking or splitting. Linseed oil is the gold standard for cricket bat maintenance, providing essential moisture and protection that keeps the willow wood healthy and resilient.
Before beginning the oiling process, ensure your bat is completely clean and dry from the previous cleaning step. Select a high-quality raw linseed oil specifically designed for cricket bats. Avoid using boiled linseed oil or alternatives that can damage the wood’s structure. A minimal amount of oil goes a long way in protecting your bat’s performance.
Begin by applying a thin, uniform layer of oil using a soft, lint-free cloth. Start at the bat’s center and work your way outwards in smooth, consistent strokes. Cover the entire blade surface, paying special attention to the edges and any areas with visible wood grain. The goal is to create a light, even coating that penetrates the wood without saturating it. Maintaining your cricket bat requires precision and careful technique, so take your time during this process.
After initial application, allow the oil to absorb into the wood for approximately 24 hours in a cool, dry environment. During this time, the wood will naturally absorb the oil, helping to seal and protect its cellular structure. Avoid exposing the bat to direct sunlight or extreme temperatures during this absorption period, as this can cause uneven oil distribution or potential wood damage.
Once the initial absorption is complete, use a clean, dry cloth to gently wipe away any excess oil that has not been absorbed. Your bat should have a subtle sheen but not feel sticky or overly slick. A well-oiled bat will have a smooth, slightly glossy appearance and feel slightly more robust to the touch.
Verify your oiling process by checking for these key indicators: uniform oil coverage, no pooling or excess oil, and a consistent color across the blade. The wood should appear nourished but not saturated. Repeat this oiling process 2-3 times per year, or more frequently if you play cricket regularly in challenging environmental conditions.
Proper oiling is not just a maintenance task but an investment in your cricket bat’s longevity and performance. By dedicating time to this crucial step, you ensure your bat remains responsive, durable, and ready for peak performance on the cricket field.
Step 3: Use protective face tape on the bat
Applying protective face tape to your cricket bat is a crucial step in preserving its structural integrity and preventing potential damage during play. Face tape acts as a shield, protecting the bat’s surface from direct impact and reducing the risk of splintering or cracking. Selecting the right tape and applying it correctly can significantly extend your bat’s functional lifespan.
Before beginning the taping process, ensure your bat’s surface is completely clean and dry from previous maintenance steps. Choose a high-quality cricket bat face tape specifically designed for wooden cricket bats. Avoid using standard electrical or sports tape, as these lack the specialized properties required for cricket bat protection.
Start by carefully measuring the bat’s face to determine the precise length of tape needed. Begin at the toe of the bat and gradually work your way up, applying the tape in a smooth, consistent manner. Stretch the tape slightly as you apply it to ensure a tight, wrinkle-free application. Our cricket equipment checklist offers additional insights into bat protection for players looking to optimize their gear maintenance.
Pay special attention to the edges and corners of the bat during taping. These areas are most vulnerable to impact and require extra care. Press the tape firmly but gently, eliminating any air bubbles or potential lifting points. The goal is to create a seamless, protective layer that follows the bat’s natural contours. Use your fingers or a smooth cloth to ensure the tape adheres completely and smoothly.
Once the entire face is covered, trim any excess tape carefully using a sharp utility knife or precision cutting tool. Make clean, straight cuts along the bat’s edges to create a professional-looking finish. Avoid leaving any jagged edges or loose tape sections that could catch or peel during play.
Verify your taping job by running your hand across the bat’s surface, checking for any raised edges, air bubbles, or loose sections. The tape should feel smooth, flat, and securely attached. A properly taped bat will have a uniform appearance with no visible gaps or wrinkles.
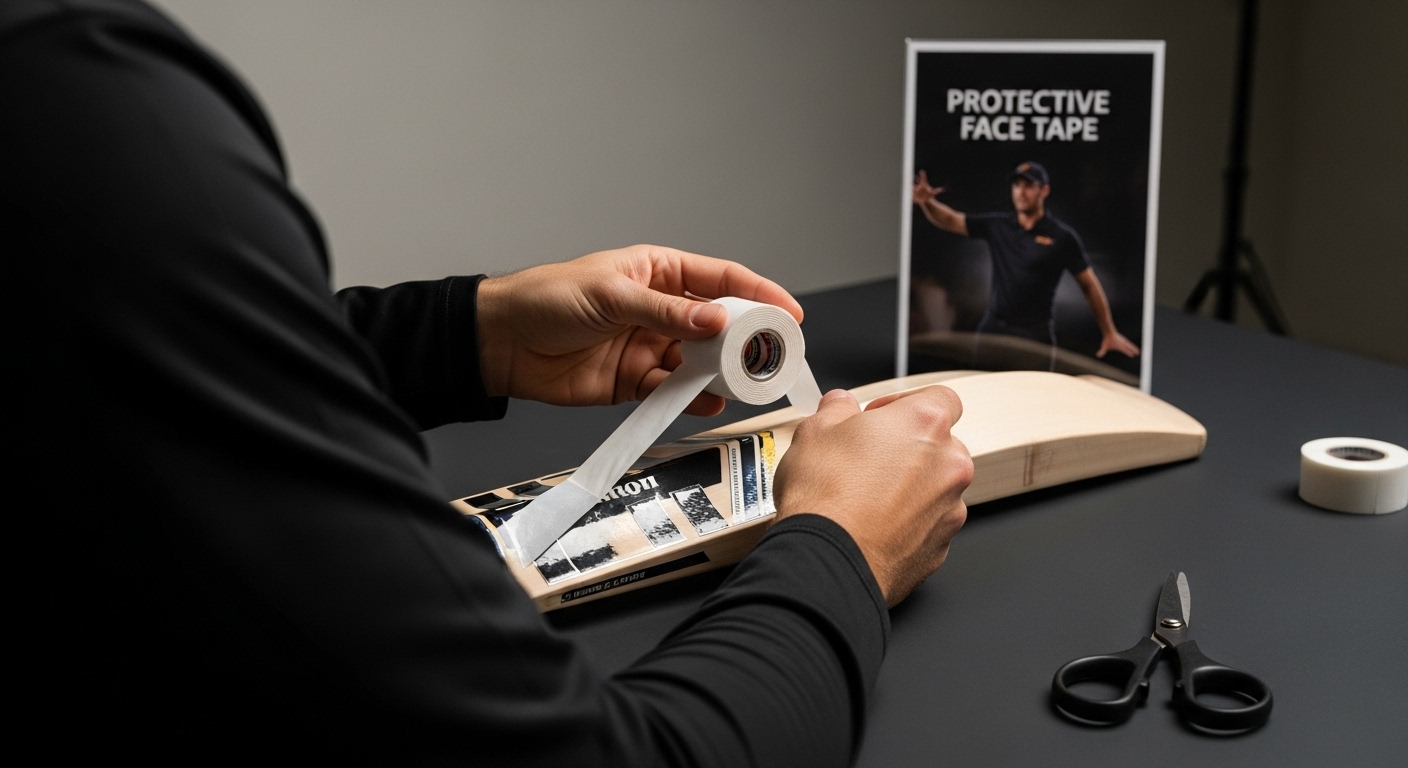
Remember that face tape is not a permanent solution and will need periodic replacement. Inspect your bat’s face tape before each cricket season or after extensive use, replacing it when you notice signs of wear, lifting, or damage. This proactive approach ensures your bat remains protected and performs at its best during critical moments on the cricket field.
Step 4: Store your bat in a safe environment
Proper storage is the final and often most overlooked aspect of cricket bat maintenance. Storing your bat correctly can prevent unnecessary damage and extend its overall lifespan, protecting your investment and ensuring peak performance during critical matches. The environment you choose for bat storage plays a crucial role in maintaining its structural integrity and wood quality.
Select a storage location that maintains consistent temperature and humidity levels. Extreme temperature fluctuations and high moisture can cause significant damage to wooden cricket bats. Ideal storage areas include indoor spaces away from direct sunlight, heating vents, or damp environments like basements or garages. A cool, dry cupboard or dedicated cricket gear storage area works best for preserving your bat’s condition.
When not in use, store your bat vertically or horizontally in a bat cover or protective case. Avoid leaning the bat against walls or leaving it in horizontal positions that could cause warping. If using a vertical storage method, ensure the bat is supported at both its toe and shoulder to prevent unnecessary stress on the wood. Our ultimate guide to choosing cricket bats provides additional insights into long-term bat preservation techniques.
Consider the humidity levels in your storage area carefully. Wooden bats are sensitive to moisture changes and can develop cracks or become brittle if exposed to inconsistent environmental conditions. Use a small silica gel packet in the bat’s storage area to absorb excess moisture and maintain optimal storage conditions. Wooden bats prefer environments with relative humidity between 45% and 55%, which helps prevent wood expansion or contraction.
Inspect your bat regularly during storage, even when not in active use. Check for any signs of developing cracks, wood separation, or unusual changes in the bat’s surface. Rotate the bat occasionally to prevent any potential warping or uneven stress distribution. A well-maintained bat stored correctly can last significantly longer and maintain its performance characteristics.
Verify your storage setup by monitoring the bat’s condition periodically. A properly stored bat should remain smooth, free of unexpected cracks, and maintain its original shape and structural integrity. Look for consistent color, no signs of wood separation, and absence of moisture damage. By dedicating time to creating an optimal storage environment, you protect your cricket bat and ensure it remains ready for your next match.
Step 5: Inspect your bat regularly for damage
Regular inspection is the guardian of your cricket bat’s longevity and performance. Identifying potential damage early can prevent minor issues from escalating into significant structural problems that could compromise your bat’s integrity and playing capabilities. A systematic and thorough inspection routine is essential for any serious cricket player committed to maintaining their equipment.
Begin your inspection by examining the bat under good lighting conditions. Natural daylight provides the best illumination for detecting subtle changes in the wood’s surface. Focus on the bat’s blade, paying close attention to the edges, face, and toe area, which are most susceptible to impact damage. Run your fingers gently across the surface, feeling for any irregularities, small cracks, or changes in wood texture that might not be immediately visible.
Concentrate on identifying different types of potential damage. Hairline cracks, wood separation, loose grain, and handle wobble are critical indicators of bat wear. Look for signs of compression around the sweet spot, where repeated ball impacts can cause structural weakening. Examine the handle’s connection to the blade, checking for any slight movements or unusual flex that might suggest internal damage. Comprehensive bat maintenance requires keen observation and proactive care to preserve your equipment’s performance.
Utilize both visual and tactile inspection techniques. Rotate the bat in different lights to catch potential imperfections from various angles. Sunlight can reveal subtle cracks or grain separations that might be invisible under standard indoor lighting. Gently tap the bat’s surface with your fingernail, listening for any changes in sound that could indicate internal wood separation or developing structural issues.
Pay special attention to the bat’s edges and toe, which absorb significant impact during play. Developing cracks in these areas can quickly compromise the entire bat’s structural integrity. If you notice any emerging damage, consider consulting a professional cricket equipment specialist or replacing the protective facing tape to prevent further deterioration.
Verify your inspection by creating a consistent log or checklist of your bat’s condition. Document any observations, measure existing cracks or changes, and track their progression over time. A well-maintained log helps you understand your bat’s wear patterns and make informed decisions about potential repairs or replacement. Typically, a comprehensive inspection should be conducted before and after each cricket season, with quick visual checks performed before and after significant matches.
Ready to Give Your Cricket Bat the Care it Deserves?
Nothing is more frustrating than seeing your favorite cricket bat lose its performance because of poor maintenance or the wrong accessories. This article broke down how crucial it is to clean your bat thoroughly, apply protective oil, use top-quality face tape, store your bat in the right environment, and check for damage regularly.
To help you prepare and maintain your cricket bat effectively, here is a summary of all the main care steps, including the estimated time and main goal for each.
| Step | Description | Estimated Time | Key Outcome |
|---|---|---|---|
| 1 | Clean the bat thoroughly | 10-15 minutes | Removes dirt and prevents moisture damage |
| 2 | Apply protective oil to the blade | 15 minutes (+24 hrs drying) | Nourishes wood, prevents cracks |
| 3 | Use protective face tape | 10-20 minutes | Shields surface, reduces risk of cracks |
| 4 | Store in a safe environment | 5 minutes (setup) | Maintains shape, prevents warping |
| 5 | Inspect regularly for damage | 5 minutes | Early detection of issues, prolongs lifespan |

Start protecting your gear and elevating your game today. Shop at CricketKingdom.co.uk to get cricket bats and accessories trusted by dedicated players. Take advantage of free shipment on orders over £100, custom batting oiling, and our exclusive ultimate guide to choosing the right cricket bat. Let your bat work at its best every time you step onto the field. Don’t wait until wear and tear forces you off your game. Explore our range and secure your next match-winning bat now.
Here is a handy checklist table to verify the completion and proper execution of each step in your cricket bat care routine, so you can ensure your bat stays in top condition.
| Step | Completion Criteria | How to Verify |
|---|---|---|
| Cleaning | Bat is free of visible dirt and debris | Surface looks clean, feels smooth, no moisture retained |
| Oiling | Uniform thin oil layer, no pooling | Color is consistent, bat is not sticky |
| Face Tape Application | Tape is smooth, no air bubbles | Surface is flat, edges are sealed |
| Storage | Bat is in dry, cool place with stable humidity | Bat remains smooth, no signs of warping or cracks |
| Inspection | Bat shows no new cracks or wood separation | Visual and tactile checks before/after each season |
Frequently Asked Questions
How often should I clean my cricket bat?
You should clean your cricket bat after every use, ensuring to remove any dust, dirt, or grime to maintain its performance and appearance.
What type of oil should I use to protect my cricket bat?
Use raw linseed oil specifically designed for cricket bats. Avoid boiled linseed oil as it can damage the wood.
How can I tell if my cricket bat is damaged?
Inspect your bat regularly for hairline cracks, wood separation, or changes in texture. Pay special attention to the edges, face, and toe area, where damage is more likely to occur.
Is face tape necessary for cricket bats?
Yes, face tape is essential as it protects the bat’s surface from impacts and reduces the risk of splintering or cracking, thereby extending its lifespan.
Recommended
- 9 Essential Items for Your Cricket Equipment Checklist – The Cricket Kingdom
- Ultimate Guide to Choosing the Right Cricket Bat | the Cricket Kingdom
- Essential Cricket Equipment in the UK: Must-Have Gear for Every Cricketer – The Cricket Kingdom
- How to Choose Cricket Bat: A Step-by-Step Guide for Players – The Cricket Kingdom